DIY

HAPPY

I saw a similar sign at Hobby Lobby and knew that I could easily recreate it.

I took a piece of scrap wood and painted it white. While it was drying, I printed out a decal using my Cricut that said HAPPY. I also saw some that said HOME and really, you could use any word that you wanted.

After the white paint was dry, I applied the decal and then went over that with Waverly Wax in the color Antique. I removed the decal letters and that was it! Very easy to do.

DIY

DIY Sunflower Themed Tiered Tray


“Keep your face to the sunshine and you cannot see the shadow. It’s what sunflowers do.” —Helen Keller⁣

My good friend Sarah from @jujubee_diy and I decided to do a 🌻 sunflower themed tiered tray decor collaboration for our YouTube channels. I think they all turned out cute but my favorite is the hello sign. I think it would look great if you made it into a door wreath. I did use my Cricut to create the vinyl decals but the rest of the supplies are primarily Dollar Tree so that makes it very budget friendly. 📺 Click HERE to watch the video.

DIY

Camping Themed Tier Tray

Sometimes you need to explore outside of your comfort zone. ⁣⁣

I am part of the Let’s Go Camping challenge this month and let me tell you, I was struggling for inspo! I saw several things at Hobby Lobby that got my creativity juices flowing and here is one of my projects. To see the rest of them, you can check out my latest YouTube video, https://youtu.be/WYIY326Uq2U and let me know what you think! ⁣⁣⁣⁣

Also, my idea of camping is a place that has 💨 air-conditioning, a mint on the pillow and a 🚿 hot shower.

DIY

Easy Peasy Lemon Squeezey

🍋 I had so much fun collaborating with hosts @SavvyCraftsWithSavannah and @TheCraftyQuinn along with some other awesome DIY YouTuber friends on this #FRUITYSUMMERPICNICCHALLENGE ⁣⁣

This tray was actually from an estate sale. The item did not sell and they were going to just toss it, but I said wait! I can make something out of it!   ⁣⁣

⁣⁣I painted the tray using Rustoleum Chalked Ultra Matte paint in the color Linen White. I added the vinyl that I had cut out using my new Cricut Explore Air 2 and wrapped the handles with jute twine. So easy to do! Check out my YouTube video for the rest of my DIY’s. https://youtu.be/5fNoKIBm_jU

DIY

Jute Rope Mini Planter

I made this cute little planter and filled it with fake lavender. One time I went to Trader Joe’s and bought an actual, real live lavender plant. I envisioned planting it in my yard and watching it grow. In realty, it did not take me long to kill it. I am not a good plant 🌿 momma so this artificial plant will have to do. 🤷🏽‍♀️⁣

Check out my YouTube channel, www.youtube.com/ourgrayhouse for more budget friendly DIY’s like this!

DIY

How to make homemade bath salts

I’ve had these vintage pill bottles around in my craft room for ages and decided to finally do something with them.  Originally I thought to make a sugar scrub but it would be hard to get the sugar scrub out of the small opening so I changed the plan to bath salts.
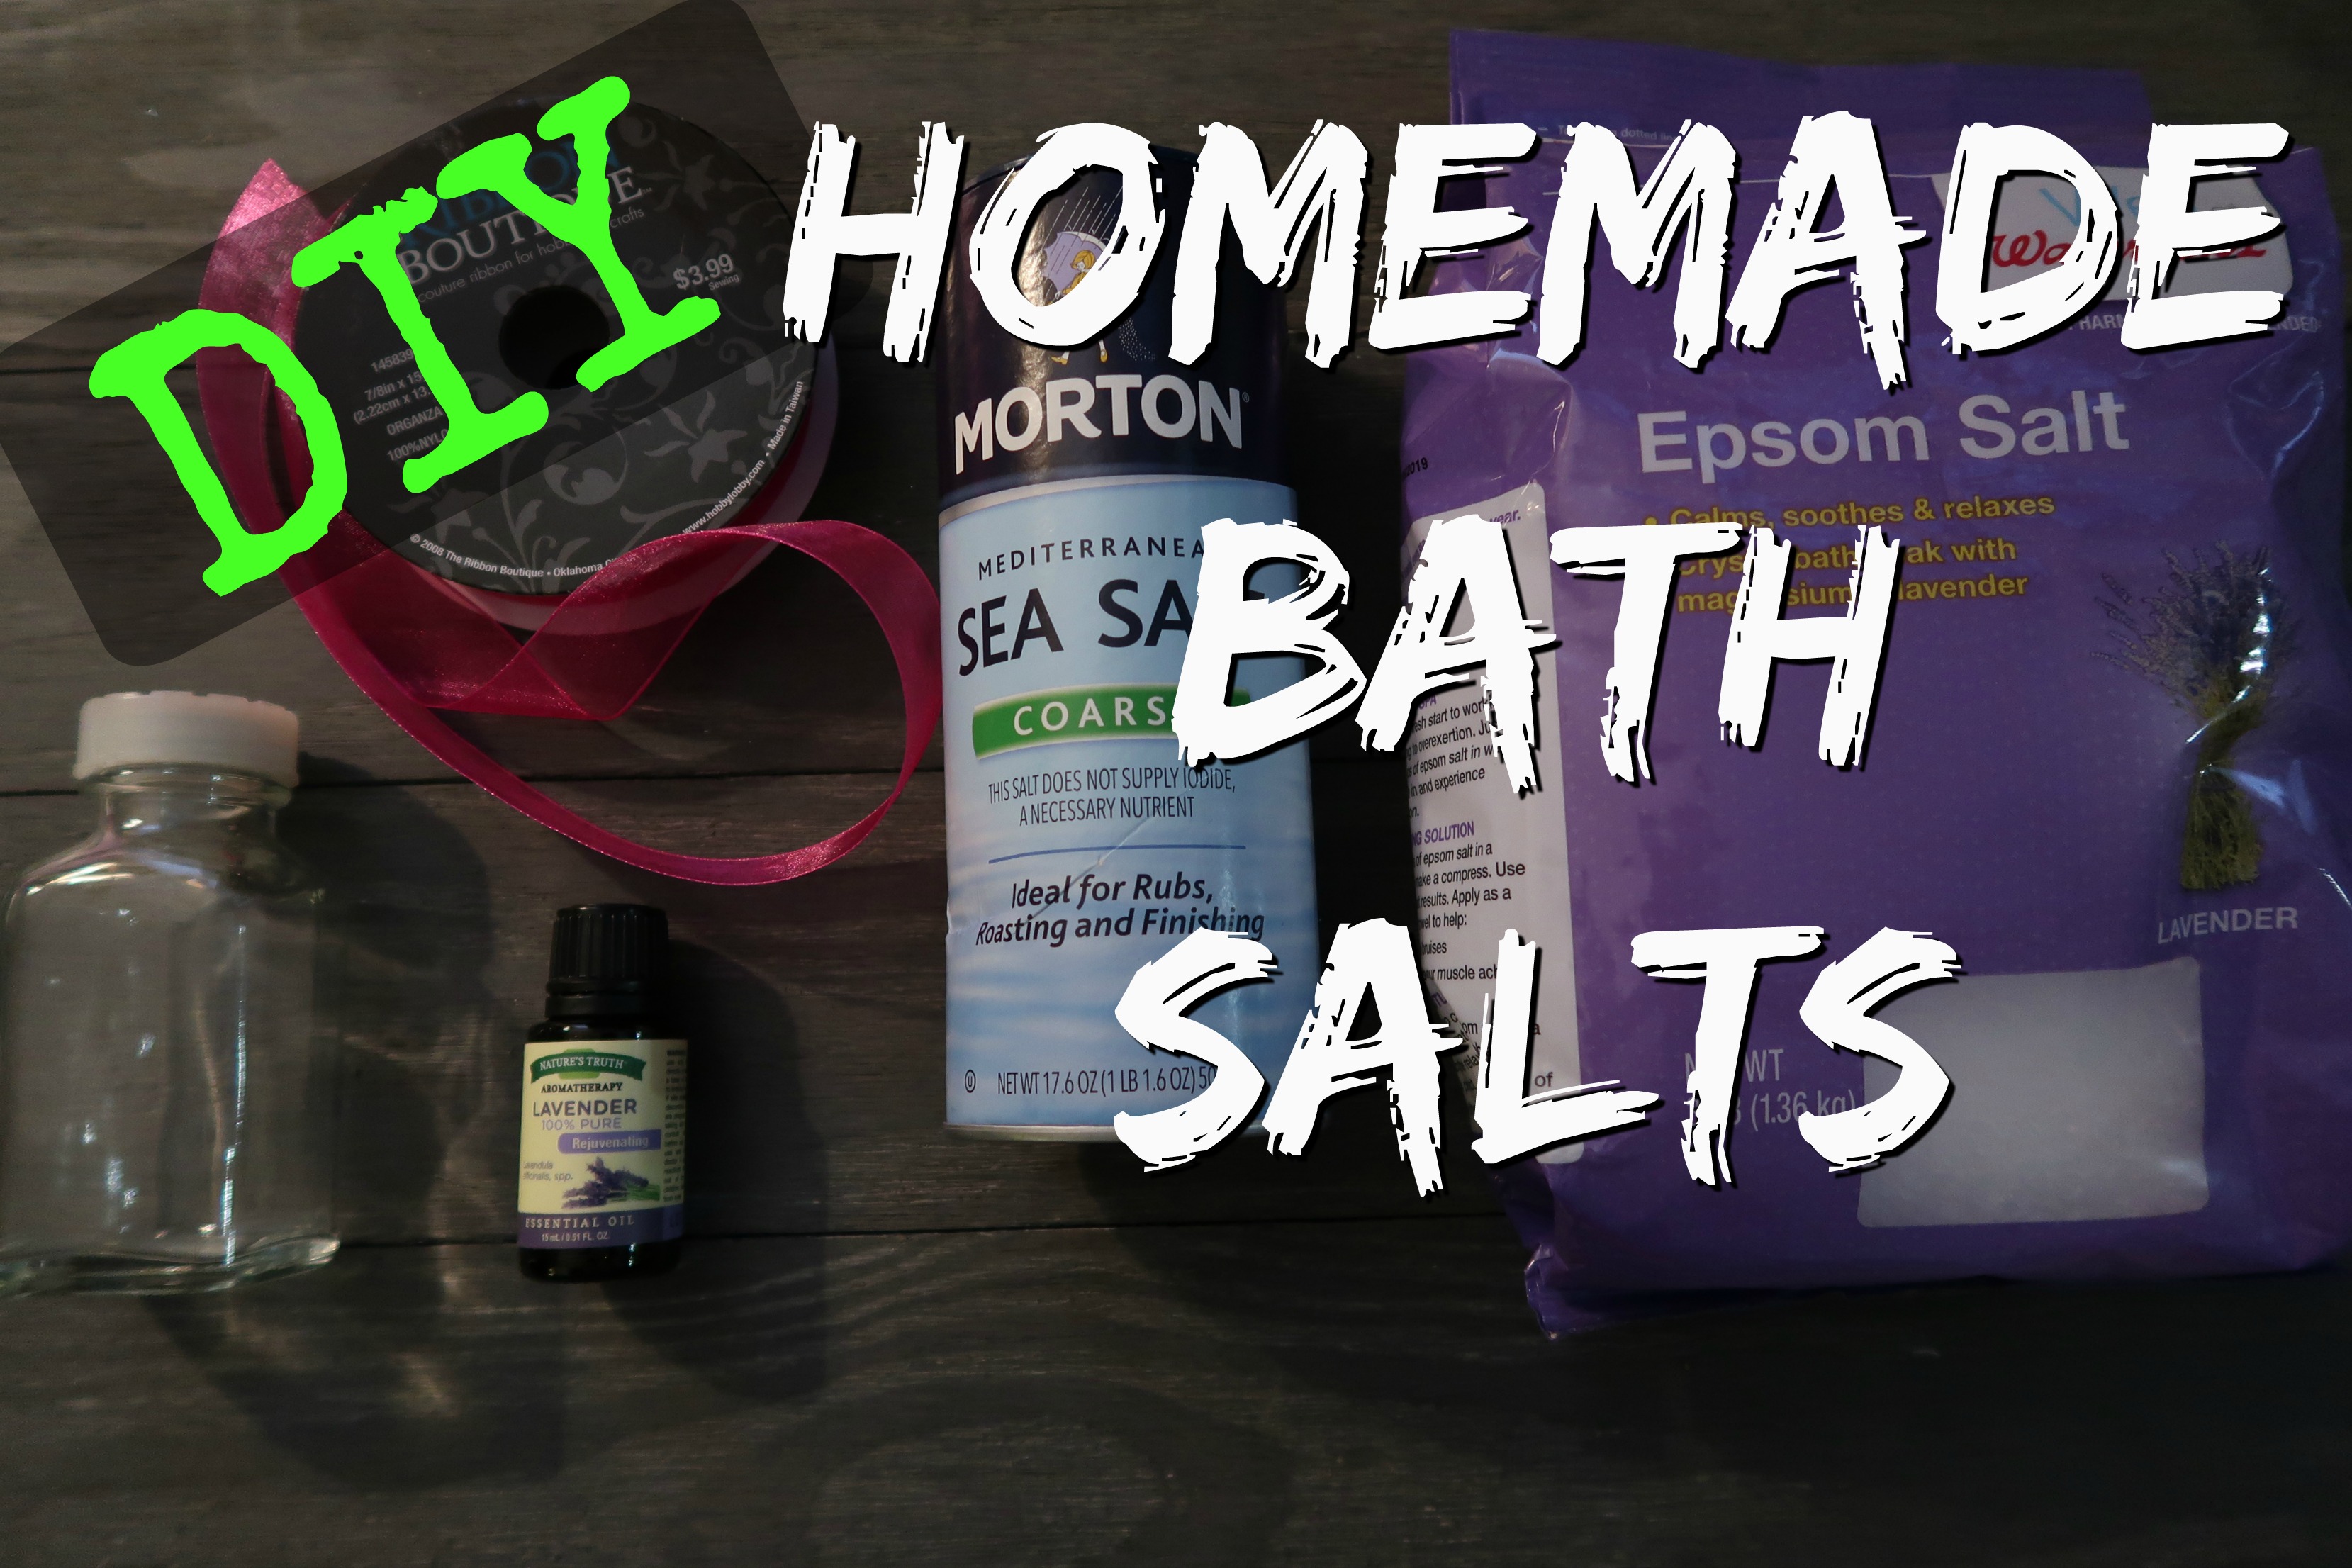
diy-homemade-bath-salts-thumb

You need:

Coarse Sea Salt – I found this on the seasoning aisle
Epsom Salt – I found this in the health and beauty aisle
Essential Oil – I used lavender
Food Coloring – you probably have some in your cupboard right now
Glass containers of your choice – I found mine at a garage sale
Embellishments to decorate

I measured out how much sea salt I had, because it was a smaller container and then added that much epsom salt.

Food coloring and you are just using this to give the mixture some color.  The amount and color you use is your personal preference.  I was going for a “pinkish” color so I added red.  When I first added it, it kind of clumped up so I had to really mix it well to coat all the mixture.

Add some essential oil to the mixture.  This step is optional but I chose lavender as it is soothing and calming.  How much you add is up to you, based on how strong you want the scent.  I then mixed it really well again to make sure it coated all the salt mixture.

I happened to have some bottles that I purchased at a garage sale but you could use any container that you like.  The bottles I used had a small mouth and I really should have used a funnel to fill the containers but I made it work.

All that is left is to embellish.  I had some stickers that I attached to the front of the bottle and then just added a ribbon to it.  Very simple and easy and they make nice little gifts!

Here’s my video on how to make it:
How To Make Homemade Bath Salts

(((hugs))) ~lisa


DIY · Fashion/Beauty

How to make a makeup brush cleaning board

I want to show you how I made a super quick and easy DIY Makeup Brush Cleaner Board. You just need a few things:

* I also created a template to guide me as I glued onto the clipboard

img_1630

I know that I need to be better at regularly cleaning my brushes but for me it was always so messy and time consuming because I didn’t have a tool to help me.  I saw a DIY on Facebook one day and then I watched several videos on YouTube and thought, “I can make that!”  So I did!

I glued dots, squiggly lines, spirals and zig zag lines onto the clipboard.  I let it thoroughly dry and then cleaned my brushes using baby wash.  It worked really well and it was easy to use.  A lot less mess than me doing it by hand.

Here’s my video showing you how I did it!

DIY Makeup Brush Cleaning Board

** some affiliate links are included in this post

(((hugs))) ~lisa

DIY

Snowman DIY Glass Jar Christmas Craft

All you need is a glass jar, some fleece and a sheet of sticky back felt sheet in black.

img_2069

Some of these measurements will depend on the size jar that you use because you will want it to be proportionate.

I cut the fleece into strips and cut the black felt into small button sized circles.  I actually used a button as my pattern for the circles.  I had originally hot glued buttons on the glass jar but they didn’t stay on.  Not sure why but I didn’t have time to figure that out so I moved to Plan B which was the sticky back felt sheet.

You can click HERE to see my Pinterest board and the inspiration piece that got this project going.

Here is my end result and I think it turned out pretty good.

img_1544

If you try it be sure and leave a comment below so that I can check it out!

(((hugs))) ~lisa

DIY

Thanksgiving decor DIY

Y’all know I can’t stay away from my DIY projects for too long!  It’s been quite a while since I crafted and so I took some time tonight to complete a project…just in time for Thanksgiving too!

give thanks

Here’s my inspiration piece:

give thanks inspiration

I spotted this in Kirkland’s one day and thought it looked easy enough to make.  I mean really, how hard could it be?  😉 

I basically printed out my inspiration pic, held up my burlap and shone a light behind it and then traced it with my black sharpie. 

My awesome hubby cut out the wood for me and then I painted it orange. 

I had the “jewels” and the burlap flower in my craft supplies. 

I cut the burlap to size, hot glued it to the wood, added the flower and the jewels and voila!  My version is complete!

What do y’all think? 

(((hugs))) ~lisa